09. Tracks and timeline¶
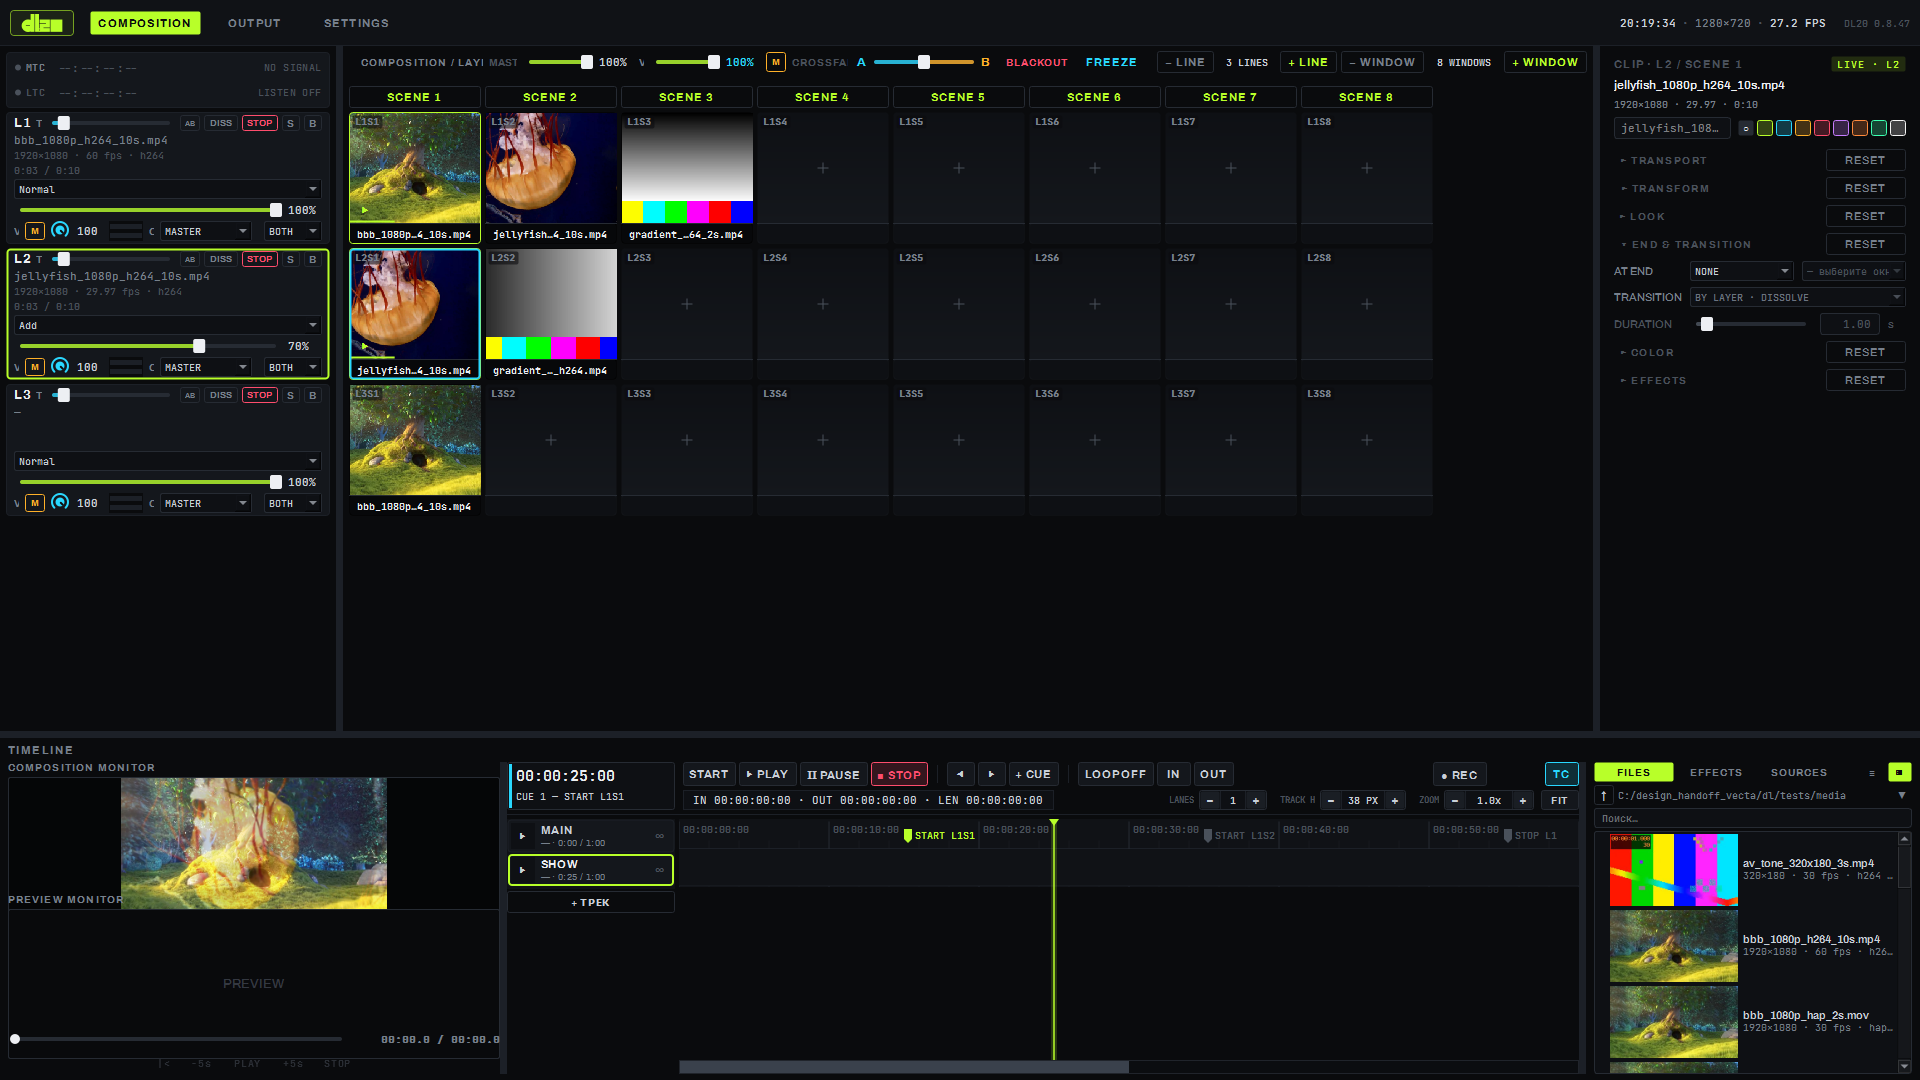
A track is a named sequence: clip blocks, automation curves and cues gathered in one object that is placed into a grid window and started like a regular clip. Several tracks play in parallel on different layers; one layer cannot be shared by two tracks. The timeline is the editor and transport for tracks: a ruler, clip blocks, cues, automation recording — all in the bottom panel of the COMPOSITION screen, next to the monitors and media browser.
Tracks¶
The Main track always exists and cannot be deleted — it owns the show's shared parameters that are not tied to any one layer (master levels and the like, anything that does not run on a track). Other tracks are added with the + ТРЕК (+ TRACK) button below the list (default name — "ТРЕК N" (TRACK N), renamed with a right click on the row → "Rename…").
A track's row in the list on the left:
- the ▶ button starts the track, turning into ■ — stop — while it plays; clicking the grid window the track was placed into has the same effect;
- the ∞ icon — loop the whole track;
- a frame highlights the track that is currently being edited — its blocks, lanes and curves are the ones shown in the editor on the right; selecting another row switches the editor to it.
Lanes are rows of clip blocks within one track that are mixed into the track's single picture; a track always occupies exactly one layer — the one whose window it was placed into, not the one named by the clips inside it. The number of lanes is changed with the LANES stepper (− / N / +) next to the editor.
To get a track onto the grid, drag its row from the list onto an empty (or occupied) scene cell — from then on that cell behaves like a regular window: a click starts and stops it, a right click opens it.
Scheduled playback¶
A right click on a track's row → "Schedule…" sets a time-of-day window, START / STOP: inside this window the track starts itself, outside it, it stops itself. This mode is for unattended displays and installations: the program can be started at any moment inside the show window, and the track will pick up the show by itself. "Clear schedule" removes the binding.
Tags and filter¶
A track can carry tags — short labels for searching and grouping (up to 16 tags, each up to 24 UTF-8
bytes). A right click on a track's row → "Теги…" ("Tags…"), or Ctrl+T on the track being edited,
opens a dialog with a comma/space/;-separated list (for example "intro, warmup"); duplicates that differ
only by case are dropped automatically. Tags show on the track's second line in the list — " · #intro
warmup".¶
The FILTER field above the track list searches, case-insensitively, a track's name and its tags; matching tracks stay in the list, the rest are hidden — the Main track is always visible, even when it does not match the filter. The "+ ТРЕК" ("+ TRACK") button clears the filter before adding a new track, so the new track does not disappear from the list. The filter is session-only state, not saved to the project — the list is full again the next time the program starts.
Track groups¶
Several tracks can be combined into a group with one shared transport — the group has one master that drives the position, and the other tracks ("members") follow it every tick. A right click on a track's row → «Новая группа из трека» ("New group from track") creates a group with that track as the (so far only) master; «Добавить в группу ▸» ("Add to group ▸") on another track makes it a member (if that track was already in another group, it leaves that group first).
In the track list the group shows as a header row in place of its first member by rack order: ▸/▾ collapses and expands the member list, ▶/■ starts and stops the WHOLE group (the button's state follows the master), next to a caption "GROUP · N TR · M <master's name>". Members sit under the header, indented, with a "M" badge before the master's name; a collapsed group hides its member rows (except one that failed to start — see below), and selecting a member of a collapsed group expands it automatically. The FILTER field shows a group's header whenever at least one of its members is visible.
▶/■ on ANY member acts on the whole group — every track in the group starts and stops together, and
jump events (universal crossfade and the like) fire on each one. A selected member's canvas still shows ITS
OWN timeline — its blocks are edited independently of the other members — but the playhead on it is the
MASTER's position: scrubbing the ruler, ◀/▶, Shift+,/Shift+., Enter, double-clicking a section,
GO cue and play-to on a member all drive the master, i.e. the whole group; a member's canvas header starts
with "GROUP
Loop, the quantiser and the Reset on stop rule of a group are the MASTER's fields, not the member's. On
a member's canvas the LOOP/IN/OUT/FULL buttons, LOOP § and the loop handles on the ruler
edit the master's loop (one Undo entry), and the value line above the canvas says "петля — мастера Alt+Q) show and edit the master's QUANT
and Reset on stop (caption "— мастера Shift+Space and
LOOP § on a member use the master's section under the playhead. Long group and master names in the value line
are shortened with an ellipsis. If the layer a member is assigned to is held by the master or another member
when the group starts, that track does not start — its row in the list gets the caption "не заиграл: линия
занята" ("did not start: layer busy"), and a line naming both tracks goes to the session log. A member
shorter than the master simply shows nothing past its own end; a member longer than the master only shows its
tail once the master is no longer shorter than it.
A right click on a member's row offers «Убрать из группы» ("Remove from group") and, for a non-master
member, «Сделать мастером группы» ("Make group master"); a right click on the header offers
«Переименовать группу…» ("Rename group…"), «Свернуть/Развернуть» ("Collapse/Expand"), and
«Удалить группу (треки остаются)» ("Delete group (tracks remain)") — deleting a group leaves its tracks
in place, each with its own transport again. Every one of these operations except collapsing is one Undo
entry (Undo does not change the group's current collapsed state either); removing a track that is a member or a master is also one Undo that restores both the track and its
place in the group. Group membership, the master and the collapsed state are saved in the project; a project
with no groups at all is unchanged in the file. Delete on a scene cell holding a group member takes it out
of the group and stops only that track — the group plays on; Undo returns the track to the group, but not to
the cell (drag its row onto the cell again).
A group has its own color. A right click on the header → «Цвет группы…» ("Group colour…") opens the usual color picker; «Убрать цвет» ("Remove colour") clears it. The color shows as a colored chip before the group's name, a colored stripe on the left of its members, and the same color on the group's row in the web remote; changing it is one Undo entry ("Group colour").
A cue can have a «Track GO» action. In a cue's Edit Action… window, besides "Assign Slot" and "Set
Param" there is a Track GO type: the target is any track in the rack or any group (groups are listed as
"GROUP: Edit Action… window; a long label is cut with an ellipsis at the next cue. If the target track or group
was deleted, the cue's target field stays as "? (gone)" instead of silently retargeting the cue, and firing
such a cue only writes a line to the session log. OK in the window without changes changes nothing and adds
no Undo entry.
The web remote shows and starts groups. The TRACKS card (SETTINGS → REMOTE CONTROL → phone or tablet) shows every group (a color chip, its name, "N TR", ▶/■ by the master's state, GO▸) and its members indented below; a tap on the remote goes through the same door as the button on the panel — ▶ on a member starts the whole group, and a refusal (layers held by another track) highlights the refused track's row and the holder's row on the machine, just like a mouse click. The session log names the track of every remote command as "#id name". GO▸ on a track that is not selected on the panel leaves the machine's PREVIEW monitor alone. The remote only shows and starts groups: creating, renaming, assembling or coloring a group can only be done on the timeline panel.
Tracks and groups have OSC addresses (0.8.84).
/composition/tracks/{N}/{connect|disconnect|toggle|go|position} and the same under
/composition/groups/… (N is one-based by rack order, the main track is 1; there is also an
.../id/{ID}/… form by the track's or group's id). A group is fired by its master; a member track's address
drives its whole group; an unknown track writes osc track N -> no such track to the log. The full list and
argument rules — page 14. OSC reference. There is no addressing by name — only the
rack index or the id; go refuses without the timeline panel open on screen; there is no OSC feedback
(the program does not send state out).
Not yet in groups: dragging a row onto a group or multi-selecting rows for a group operation; a group nested inside another group; exporting all of a group's members as one file.
Timeline — transport¶
- START — return to the beginning and pause; ▶ PLAY — play from the playhead; Ⅱ PAUSE — pause in place; ■ STOP — stop the timeline's blocks (does not touch a live deck window) and return to the beginning or the loop boundary.
- ◀ / ▶ next to the transport — jump to the previous/next cue. Within the first second after the current
section's start ◀ (
Shift+,) goes to the previous cue, later — to the start of the current section, so repeated presses step back cue by cue on a playing track too (since 0.8.93; before, on a playing track ◀ kept returning to the start of the same section). - + CUE (or a double click on the ruler) — add a cue at the current playhead position.
- LOOP — toggles repeating the marked IN–OUT range; the IN / OUT buttons set the range boundaries at the current playhead position, FULL stretches the range over the whole timeline; the boundaries can also be dragged directly by their markers on the ruler.
- ● REC — records automation: together with PLAY, moves of the selected layer's and the master's faders are written into curves (excess points are thinned, an already-recorded range can be overdubbed, recording can be undone with a single command); while recording is not running, the button shows an ARMED chip.
- TC — enables following incoming timecode (MTC/LTC): the timeline position follows it, and tracks
with a start TC set (right click on a track's row → "Set start TC…") start when their address is
reached.
Since 0.8.99, while TC is on, a track with an address lives in the window
[address, address + track length): if the timecode runs outside it, the track stops as with STOP; details are in 12. Synchronization and timecode.
Full screen and editing keys¶
The MAXIMIZE button in the bottom panel's header (next to the track's name), or the ** key (the
same physical key as **Ё** on a Russian layout), hides the deck grid, the inspectors and the browser above
— the timeline takes over the whole COMPOSITION screen; pressing it again (the button becomes **RESTORE**)
brings the previous view back. Live output and sound are not interrupted. The maximized state lasts only
for the current run of the program — it is not saved into the project and does not become part of the
saved panel layout. The ** key works anywhere on the COMPOSITION screen (except input fields), while
Ё on a Russian layout works only while the focus is on the timeline canvas.
The keys below act while the focus is on the timeline canvas (click it first), and are caught by the physical key — so they work regardless of the interface's keyboard layout (including a Russian one):
| Key | Action |
|---|---|
J |
shuttle backward; repeating it the same direction — ×2, then ×4 |
K |
pause, shuttle speed returns to ×1 |
L |
shuttle forward; repeating it — ×2, ×4, same as J |
Space |
PLAY if the track is not playing, otherwise PAUSE |
I |
LOOP IN at the current playhead |
O |
LOOP OUT at the current playhead |
S |
split the selected block under the playhead |
Q |
trim the START of the selected block to the playhead (moves the in-point) |
W |
trim the END of the selected block to the playhead |
Home |
playhead to the start, pause |
End |
playhead to the end of the content, pause |
↑ |
playhead to the previous block or cue edge |
↓ |
playhead to the next block or cue edge |
+ / = |
zoom in, anchored at the playhead |
- |
zoom out, anchored at the playhead |
Shift+Z |
show the whole track length (same as the FIT button) |
` (Ё) |
MAXIMIZE / RESTORE (Ё — with the focus on the canvas) |
Ctrl + drag a block edge |
ripple-trim: the edge is trimmed, the lane's tail follows with no gap (0.8.62) |
Shift + drag a joint |
roll: the joint moves, the pair's combined length does not change (0.8.62) |
Ctrl+Q |
ripple-trim the START of the selected block to the playhead (0.8.62) |
Ctrl+W |
ripple-trim the END of the selected block to the playhead (0.8.62) |
| Left-button drag along the ruler | scrub: the playhead follows the cursor, the frame updates (0.8.63) |
Mouse wheel (and Ctrl + wheel) |
zoom in/out around the cursor (0.8.63) |
Shift + wheel |
scroll the view in time (0.8.63) |
Alt + wheel |
track height |
Shuttle speed is session-only transport state, like pause: it is always ×1 when a project is opened or
when transport stops. At any speed other than ×1 (forward or backward) the file on a lane plays at normal
speed and jumps to the playhead about 10 times a second: the picture updates in steps, the lane's sound
comes in ~100 ms fragments (on J the fragments still play forward), and H.264 files load the decoder
noticeably more. Cues only fire while moving forward; REC does not record while moving backward (J).
Snapping (SNAP) — a button in the timeline's header next to the LOOP group, on by default. While it is on, dragging or trimming a block, and dragging a cue or the LOOP IN/OUT handles, snaps to the edges of every lane's blocks on the track, to the playhead, to cues and to the LOOP IN/OUT bounds (the loop bounds are a target only while LOOP itself is on); the snap threshold is 8 px of canvas. Holding Ctrl during the gesture temporarily turns snapping off — only rounding to the frame grid remains; Shift does not turn it off (before 0.8.61 Shift turned off the old MAGNET snapping). While snapping is active, a vertical dashed line labelled SNAP is shown on the canvas. On a narrow window the SNAP button hides together with FULL — snapping can then only be toggled with Ctrl during the gesture itself.
Ripple-trim and roll (0.8.62). Ctrl + dragging a block's edge, instead of a plain trim, trims that
edge and moves the whole lane's tail (the blocks further right on the same lane) so no gap is left; other
lanes on the track, the playhead, cues and the LOOP IN/OUT bounds stay where they were. Ripple-trimming the
START of a block does not move the block itself in time — only the point where it enters the file changes
(the picture in the block starts from a later frame), and the tail follows by that same amount; trimming
the END, if lengthening it runs into the end of the source file, moves the tail by the delta actually
applied, not the one requested. Shift + dragging the joint between two neighbouring blocks on the same
lane (butted together, or with a gap no larger than one frame) is roll: the joint slides left or right, the
right block moves with the joint (a gap of up to one frame is kept), and the pair's combined length never
changes; the left
block cannot become longer than its own source file or shorter than one frame, and the right block cannot
move its in-point earlier than the start of its own file — the joint stops at either limit. A Shift-click
on the edge of a block that has no neighbour butted against it does not start a roll — the block is simply
added to the selection, like an ordinary Shift-click on its body. Ctrl+Q and Ctrl+W are the same
ripple-trim for the START/END, but applied to the SELECTED block at the current playhead (which must sit
strictly inside the block) instead of a mouse drag. During the gesture the tail and the joint are drawn in
their new places as a preview, while the model itself changes only when the mouse button is released — a
single Undo command restores both the trimmed block and the tail that followed it; Esc during the gesture
cancels it entirely, and no other key works until the mouse button is released. SNAP still works during a Ctrl-drag on an edge: Ctrl here picks ripple instead of
a plain trim, it does not turn snapping off. Block speed/reverse (0.8.79) and transitions between
neighbouring blocks (0.8.77/0.8.78) are covered under "Clip blocks" and "Transitions" below.
Ruler scrub and the wheel (0.8.63). Hold the left mouse button on an empty spot of the ruler and move —
the playhead follows the cursor on the frame grid, and the frame in PREVIEW and on the output changes with
it; release, and the playhead stays. A PLAYING track is not paused — it keeps playing from the new place;
the scrub does not snap to cues or block edges and does not go into Undo. Pressing a LOOP IN/OUT handle or
a cue mark still drags that handle or cue, not the playhead. There is no auto-scroll at the edge — past the
edge of the timeline the playhead stops at the edge of the visible range. The mouse wheel anywhere over the
timeline (over the ruler and over the tracks) zooms in and out around the cursor, and so does Ctrl+wheel;
scrolling in time is Shift+wheel, track height is Alt+wheel.
Cue¶
+ CUE or a double click on the ruler adds a cue at the playhead position; a cue's name can be changed, the mark itself dragged along the ruler (snapping to the frame). A cue has an optional action: none (just a mark), Assign Slot — assigns a source (a file, a live input or a ready clip from the palette) to a layer, or Set Param — sets the value of one of the ready-made parameters (master opacity, master crossfade, layer opacity) with a fader. The GO button on a cue jumps to the next mark.
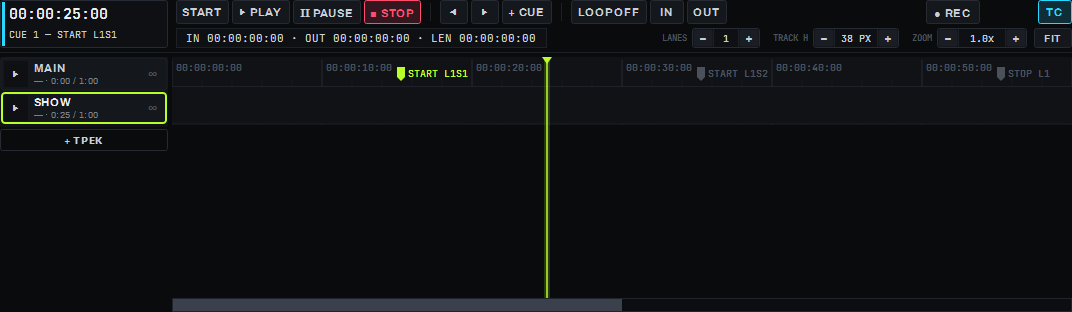
In the frame above — an example show with three cues: the names "START L1S1", "START L1S2", "STOP L1" were set by the operator himself, so the ruler shows at a glance what will happen at each point; the timeline does not parse the name's text, it is just a label. The transport's digital readout shows the most recently passed cue — "CUE 1 — START L1S1" at the 25 s mark.
Sections¶
The timeline splits each track into sections — the stretches between neighbouring cues: from one cue to the next; a track with no cue at all is one section for its whole length. A section takes its name and color from the cue at its start; the first section, if there is no cue before it, stays unnamed and shows in a dim color.
Sections show as colored stripes in the ruler's bottom 11 px, right under the time scale (the loop and cue flags are drawn on top, as before); the section the playhead is currently in is brighter than the rest and outlined. The transport's digital readout shows the current section on its own line — "§1 · NAME" or just "§1" for an unnamed one.
A cue has a color — one of ten, chosen so neighbouring cues on the ruler differ; a new cue (+ CUE, a double click on the ruler, Split) gets its color automatically, there is no color picker in the cue menu yet — changing a cue's color means re-creating it.
Keys for working with sections at the playhead (caught by the physical key, work regardless of keyboard layout):
| Key | Action |
|---|---|
Alt+S |
Split — a new cue at the playhead, the section splits into two |
Alt+M |
Merge — remove the cue at the start of the current section, joining it with the previous one (no effect on an unnamed first section — there is nothing to remove) |
Shift+, |
to the start of the current section, or, within the first second after it starts, to the start of the previous one (the ◀ button next to the transport; repeated presses step back cue by cue); in the first section — to the start of the track (does nothing on a track without cues) |
Shift+. |
to the start of the next section (the ▶ button next to the transport) |
Enter |
PLAY (no modifiers — the same door as the PLAY button) |
Shift+Space |
play out the current section and stop exactly at its end; pressing it again at the new boundary plays out the next section |
Alt+Q |
open the "Quantiser" dialog — the quantizer (QUANT) and the track's Reset on stop rule |
A double click on a section's stripe (the ruler's bottom 11 px) moves the playhead to that section's start;
a double click on the upper part of the ruler works as before — it adds a new cue, or opens renaming if it
lands on an existing cue's flag. Without Shift, ,/. stay a single-frame step (same with Ctrl/Alt)
— only Shift moves the playhead by a section. Section names and colors are stored in the project together
with the cues and survive saving and reopening; stopping at a section boundary (Shift+Space) is not saved
to the project — it is session-only state, like pause and shuttle speed, and it has no effect during reverse
shuttle (J) — the track runs straight through it; Shift+Space pressed during reverse playback switches
the track to forward ×1. While the track is driven by external timecode (MTC/LTC), stopping at a boundary
has no effect — the timecode sets the position every frame; if the section boundary is removed or moved
while the track is heading to it, the track stops where the boundary used to be.
The LOOP § button (in the LOOP group, labeled "§") sets the LOOP IN/OUT range exactly to the section
under the playhead and starts playback if the track was stopped; it hides from the header on a narrow
window at the same width step as FULL and SNAP. LOOP § on a playing track keeps the shuttle speed (×2/×4
stay) and clears any active Shift+Space boundary — the track keeps looping instead of stopping at the loop
end.
The quantizer — the QUANT button (next to the SNAP button in the timeline header) and the Alt+Q
"Quantiser" dialog. While QUANT is on for a track and the track is playing, jumps between sections (the
◀ ▶ buttons, Shift+,/Shift+., a double click on a section's stripe) no longer move the playhead right
away — the track plays out the current section, the target section's stripe on the ruler blinks, and the
§n · NAME readout gains a → §m suffix; the playhead jumps only once it reaches the boundary. Pressing
◀ ▶ or Shift+,/. again changes the target — since 0.8.93 the step counts from the already scheduled target,
not from the playhead (▶ ▶ — a jump two sections ahead, ◀ after ▶ — back); Esc cancels the pending jump without moving the playhead.
On pause, with QUANT off, or during reverse shuttle (J), a jump still happens right away, with no wait for
a boundary. If the target section starts with a cue that has an action (Assign Slot, Set Param), that
action fires at the moment of the jump. The Alt+Q dialog holds the same QUANT checkbox plus a
Reset on stop list: three rules for the ■ STOP button on the edited track. Always (the default, same
as every earlier release) — STOP returns the playhead to the loop start (or 0). When quantised — the same
return, but only while QUANT is on for that track; with QUANT off, STOP leaves the playhead where it was.
Never — STOP never returns the playhead: the track stops exactly where it was, its layers going dark like
any other stop. QUANT and Reset on stop are stored in the project along with the rest of the track's
settings.
Universal crossfade — the "Universal crossfade, s" field in the same Alt+Q dialog (0…10 s, 0.1 step; 0
is the default, no Undo, same as QUANT). While it is above zero, the five explicit jump doors — the ◀ ▶
buttons, Shift+,/Shift+., a double click on a section's stripe, the quantizer's deferred jump firing,
and GO cue — no longer switch the track's picture on the deck line right away: it dissolves from a freeze
frame (the last frame BEFORE the jump) into the live picture over that time. It only affects a track
currently shown on a deck line (a track with no line, or one a window has pushed off its line, is
unaffected); if that line is already running a window transition of its own, or FREEZE is on, the jump
crossfade does not start. A jump that does not move the playhead (the target is within one frame — with
QUANT on, Shift+./▶ to the neighbouring section lands exactly on the current section's boundary) neither
dissolves the picture nor dips the sound. A jump landing inside a dissolve that is still running takes whatever is on the line right now
(a mix of the old freeze and the live picture) as the new freeze, not the original one again. Sound follows
the same logic: a quantizer's deferred jump fades the track's volume down to the section boundary and back
up after it (a time-based ramp that keeps running even while paused; a boundary closer than T fades over
the remaining stretch without a step, a boundary already behind the playhead does not fade); an immediate
jump cuts the sound at
the jump and ramps it back up — there is no audio shadow here, unlike the crossfade between neighbouring
blocks (see "Transitions" below). Scrubbing the ruler, ■ STOP/PLAY, external timecode and an automatic loop
wrap are not jumps — none of them start the transition.
Notes on the ruler¶
The N key or the + NOTE button (next to + CUE) opens a "Note" dialog and drops a text note (one line, up to 120 UTF-8 bytes) at the position the dialog was opened at — if the playhead moves on while the text is being typed (for example during playback), the note still lands where the dialog was opened. On the ruler a note is a small square above the time scale with a short caption next to it (clipped if it would overlap the next note); hovering the square shows the full text as a tooltip.
A double click on the square, or a right click → "Edit note…", reopens the same dialog with the existing
text; "Delete note" in the same menu, or the Delete key with a note selected, removes it — like
every other note edit, with Undo. A note can be dragged along the ruler like a cue, snapping to the frame
grid when SNAP is on; Esc mid-drag puts it back where it was. Dropping a second note on a position
that already has one — by + NOTE, N, or a drag — never happens: the attempt either edits the existing
note or is refused, it never creates a second one at the same spot.
Notes are a pure annotation for the operator: the cue list, section boundaries, transport and export never see or change because of them. The note list is separate from the cue list; loading any project replaces the note list entirely — even a project with no notes at all clears out whatever notes the previous project had.
Clip blocks¶
A double click on a lane adds a clip block; a block can be dragged in time, it has a fade-in/fade-out with its own curve (linear or smoothed), multi-selection (Shift, a mouse-drawn box) and one-action deletion. The cue list and automation curves are stored in the project bit for bit; live control (a click on the grid, MIDI/OSC/remote) always takes priority over what the timeline says.
Block transform and look. Clicking one block switches the clip panel on the right into block mode: the TRANSFORM group (X, Y, SCALE X, SCALE Y, ROT, FLIP H, FLIP V) and the LOOK group (OPACITY, BLEND, name) control that block — the same way the panel controls a grid window, with one undo step per gesture (from the start of a slider drag to release, or a LOOK edit together with a BLEND change). The other groups (transport, end action, color, effects) are inactive for a block: a lane has no transport, end action or effects of its own — those stay with the deck window. Drag an occupied grid cell onto a timeline lane — the new block gets that window's transform, look and blend (mix mode) right away, in one action; dragging from the palette (no occupied cell) still creates a block with the defaults.
A block's audio and picture. The LOOK group has a STREAMS row with two toggle buttons, AUDIO
and VIDEO: turn VIDEO off and the block becomes "audio only" (shown as a waveform on the canvas, its
caption becomes "AUDIO ·
Right-click a block with audio → Detach Audio moves the block's audio to the lane below in one step:
the block itself becomes "picture only" (VIDEO on, AUDIO off), and a copy appears on the lane below at the
same place on the timeline, with the same piece of the file — "audio only", named "
Exporting the track to a file and "Save frame under playhead…" (below) honor both flags the same way the canvas does: an audio-only block is not drawn into the saved material, a picture-only block is not heard in it.
A block with no file. If a block's file cannot be found on disk (for example, the media folder was
moved), the block on the canvas gets a diagonal hatch and a "MISSING FILE ·
Block speed and reverse. Click a block — the clip panel's TRANSPORT group on the right gets active SPEED (×0.1 to ×4, default ×1.00) and DIRECTION (FORWARD/REVERSE) fields; the MODE, IN, OUT rows and the In/Out strip stay greyed out — they only show the block's source window, not editable from there — and PING-PONG is unavailable for a block (FORWARD/REVERSE only). Changing the speed clamps the block's length to the source file's material: at ×2 no more than half of the previous limit is available, at ×0.5 twice as much; a slider drag is one Undo step. Changing the speed never grows the block: slowing down may leave a gap on the right, speeding up cuts the length to the end of the file, and neighbours on the lane do not move. On the canvas, speed and reverse show as a label suffix: " ×2", " ◀" or " ◀ ×0.5" (empty at ×1 forward). A block's trim, slip, slide, ripple-trim and roll account for the source window through the same speed — on a reversed block, the edge the operator drags moves the OPPOSITE end of the source window, as if the block were already playing backwards. A block's sound is not heard, either in the live output or in an exported file, at any speed other than ×1 or in reverse — the same rule as a deck window's. Reverse on a long-GOP file (ordinary H.264/HEVC, not all-intra) is rejected the same way as on a deck window (see "Limitations" below): the live output plays the block FORWARD inside its window, the block's label dims, and the clip panel shows the hint "REVERSE · PING-PONG need an all-intra file (Hap) — this file plays forward"; exporting the same block also plays it forward inside its window — the export follows the live output. If such a reversed block goes out through a crossfade and the file has less material ahead of the window than the transition needs, the transition's shadow may freeze on the file's last frame. Save Clip as File saves the block's source-window material as is (2 s of source for a 1 s block at ×2), at normal speed and forward — speed and reverse are not baked into the file. Detach Audio refuses a block at a speed other than ×1 or in reverse (the item is greyed out, reason "speed ≠ ×1 / reverse"): such a block's sound is silent, and an audio-only copy would play out of step with the picture. Since 0.8.92 the silence is visible before you act: for a selected block whose sound is silent, the clip panel shows a line "БЕЗ ЗВУКА: <причина>" (no sound: reason) right under the SPEED row — "×2", "реверс" (reverse), "ключи SPEED" (SPEED keys), several reasons separated by commas; the SPEED fader and this line carry the tooltip "Скорость ≠ ×1, реверс и ключи SPEED выключают звук блока — в показе и в экспорте" (speed ≠ ×1, reverse and SPEED keys mute the block's sound — live and in export), and the greyed-out block menu item names the reason: "Detach Audio — нет звука: ×2" (no sound: ×2). After RESET TRANSPORT the line goes out at once. Only a block of a file with an audio track gets the line and the reason: a file without sound (or a generator) shows no line, and the item stays a greyed-out "Detach Audio" — there is no sound even at ×1. A deck window's SPEED fader has no rule tooltip.
SPEED keyframes on a block (0.8.86). The SPEED row in the TRANSPORT group also gets a ◆ button — the
same as X/Y/SCALE/ROT/OPACITY below: clicking it adds a key with the current speed, dragging the SPEED slider
writes (or overwrites) a key at the playhead in one gesture (one Undo step), and with "● REC" armed on a
playing track it records the same way the other properties do. DIRECTION is not covered by keyframes — reverse
on a block with SPEED keys stays a single value for the whole block. Time inside the file is computed as the
INTEGRAL of speed along the curve (not "time × speed"), one formula for the canvas, the live output and the
export: wherever speed is above ×1, a second of block time consumes more file material — the preview tiles and
waveform on the canvas bunch up there. The block's length is clamped to the file's material (the same rule as
the static SPEED above, only through the curve's inverse integral) on any key edit and on any static speed
change; trim, slip, slide, ripple-trim, roll and split, as well as the crossfade tail, all account for the same
source window through these same formulas (the roll/crossfade tail = the file's remaining material to the
block's end minus the current length). Trimming the left edge of a block with keys keeps the first frame under
the new start, and the curve continues from the new start — keys, like X/Y/SCALE/ROT/OPACITY's, are anchored to
the block's start in its own local time. If, with that curve, the source window would run past the end of the
file, the left edge stops at the last frame where the window still fits: the first frame does not jump, and
undoing the trim restores the previous block with no extra second one. A split inside a Smooth segment of the
SPEED curve is continuous at the cut — the frames on either side are neighbours. A SPEED key that shortens the
block lands within the new length itself. Detach Audio on a block with SPEED keys refuses with its own
reason, "speed keys" (the menu item reads "Detach Audio — нет звука: ключи SPEED", since 0.8.92). A block's sound with SPEED keys is silent ENTIRELY — even when every
key sits at ×1 (the mere fact that speed is animated mutes it, the same as reverse or a static speed ≠ ×1 do).
The engine gives the player the instantaneous speed every frame without a seek, and only checks the drift
against the curve's position once every 0.1 s — it seeks only when that drift exceeds half a frame, so a lane
with SPEED keys is not reseeked on every frame the speed changes (between those checks, the position can drift
from the curve by up to half a frame). A block with SPEED keys gets a " ×~" caption suffix (instead of " ×2"
and the like for a static speed). RESET TRANSPORT clears SPEED keys together with resetting speed and
direction to ×1 forward, in one command. On the block's body the SPEED curve can be picked the same way as the
other animated properties, by the "◆ SPEED" label or the ◆ button (see below) — its value band is logarithmic:
range 0.1…4, the ×1 node sits slightly above the middle of the band (not exactly centred — the range is
asymmetric on that scale), values drag within the same range and clamp to the band's edge. The block's
selection follows it through any SPEED key edit that changes its length. A project with no SPEED keys saves bit
for bit as before (the keys.speed JSON field is written only when the curve is non-empty). This release
closes the editing-spec group C of the disguise spec (C1 — speed and reverse, 0.8.79; C2 — X/Y/SCALE/ROT/
OPACITY keyframes, 0.8.80; C3a — the curve on the block and recording sliders, 0.8.81; C3b — SPEED keyframes,
this release); next in the disguise spec is group H, by the customer's word.
Keyframes on block properties. Five of a block's properties — X, Y, SCALE, ROT (TRANSFORM
group) and OPACITY (LOOK group) — can carry keyframes: in block mode each of these rows gets a ◆ button
with three states — a dim "◇" (no keys, plain static value), a bright "◇" (the property is animated but has no
key at the playhead) and a pressed "◆" (there is a key at the playhead, within half a frame). Clicking ◆ adds a key with the
current static value, or removes the key at the playhead; the ◆◀ / ◆▶ buttons under the TRANSFORM rows
move the playhead to the block's neighbouring key. Once a property is animated, dragging its slider or editing
its number field no longer touches the block's static value — it writes (or overwrites) a key at the current
playhead instead; the whole gesture writes one key (at the moment the gesture started, even while the track
plays) and counts as one Undo step, same as an ordinary TRANSFORM/LOOK edit. The FILL and STRETCH
buttons also write keys at the playhead for animated X/Y/SCALE/ROT. With the playhead outside the block, the key
is set and removed at the nearest block edge. On
the block's bottom edge, key moments are shown as small diamonds (visible once the block is wider than 24 px on
screen): dragging one moves the moment's keys in whole-frame steps, Alt+click deletes the key, a double click
moves the playhead exactly onto it, and a right click opens a Linear / Smooth / Delete key menu;
pressing a diamond of an unselected block selects that block, the diamond's tooltip lists the moment's properties
("X · OPACITY"), and a key moved onto an occupied moment replaces it. Keys past the right edge (after a trim) are
kept but get no diamond, and ◆◀ / ◆▶ skip them.
Between two keys the value is interpolated along a straight line (Linear) or an S-curve (Smooth); before the
first key and after the last one, the value holds at the edge value. A block's picture in the live output, the
export and the canvas is all read through one function (ClipBlock::resolvedValuesAt/resolvedAt) — the three
paths cannot disagree on the picture. Keys are anchored to the block's START, in its own local time: moving the
block carries its keys along, while trim, slip, slide, ripple-trim and roll do not shift them (none of those
edits move the block's start point); splitting a block keeps the picture continuous on both sides of the cut by
adding boundary keys there (a cut inside a Smooth segment changes the shape of the halves — the values at the cut are exact). RESET TRANSFORM and RESET LOOK clear their group's keys together with resetting
the static value, in one command; a Detach Audio copy and the Exact mode of "Save Clip as File" both
clear keys. OPACITY keyframes do not affect sound; sound is muted by fades and the STATIC opacity — in the export
as before, and as of 0.8.84 the live output too (before that, live sound only listened to the crossfade
weight and the jump ramp — this mismatch with the export was a debt predating C2; the customer's ruling,
"the export is the reference," closed it). A project with no keys saves bit for bit as
before. There are no keys yet for SCALE Y (with LINK off), FLIP H/V or BLEND. SPEED keyframes are in the
TRANSPORT group, described separately above ("SPEED keyframes on a block", 0.8.86).
Key curve on the block and recording sliders. While a block is selected, its body shows the curve of ONE
active property (chosen by clicking ◆ in the clip panel, by an auto-key, or by the "◆ J), a slider drag is thinned
(tolerances X/Y 2 px, SCALE 1%, ROT 1°, OPACITY 0.02) and written into keys; the picture follows the slider for
the whole take, the ◆ button of the properties being recorded turns red, and a dashed line of raw (not yet
thinned) points is drawn on the block over the curve. The take ends on STOP, disarming REC, reverse shuttle, selecting a
different block or track, the playhead leaving the block, and also right before dragging, moving or deleting the
take's block or editing its keys with ◆, a node, a diamond, a double click, RESET or FILL/STRETCH — and produces ONE
Undo entry, "Record keys"; while it runs, the timeline's "● REC" blinks. The first take of a previously static
property adds static-value keys at the block's start and one frame before the first point — the part of the block
before the take keeps its prior look; if the playhead jumped back inside the block, earlier keys are replaced only
on the stretches the take covered; the tail of a slider gesture after the take ended writes nothing. Static edits made to the block during the take (FLIP, LINK, name, blend)
end up in that same final block and are not rolled back on STOP. Without REC armed, dragging a slider is still
the plain 0.8.80 auto-key (one key per gesture). The curve shows only one property at a time, including SPEED
— its band is logarithmic (see "SPEED keyframes on a block" above, 0.8.86); the rest of the node, menu and
label behaviour is the same as for X/Y/SCALE/ROT/OPACITY.
Transitions¶
Two blocks on the same lane standing joint (no gap, or a gap no wider than one frame) can be joined by a crossfade — the outgoing block dissolving into the incoming one, instead of only a hard cut. Right-click the incoming block → the Transition submenu: Cut (the default), Crossfade 1 s and Dip to black (a 0.5 s fade-out of the outgoing block plus a 0.5 s fade-in of the incoming one, using the existing fades, as one Undo command for both blocks). The block's effects window (double-click) gets a CROSSFADE item with a duration field — the transition's curve is linear only, there is no curve choice the way a fade-in/out has one.
At the joint itself, when neither block is selected (otherwise their own fade handles sit there), a "⟩⟨" handle appears. Dragging it right or left from the point you pressed changes the transition's length in whole frames — from 0 (back to Cut) up to a limit worked out from the actual material, not just what was asked for: the smallest of the requested length, how much of the outgoing block's source is left PAST the point where it ends on the ruler (its "tail"), and the incoming block's own length. When there isn't enough material, the transition shortens itself rather than refusing outright — the caption honestly names the length it settled on and flags the shortfall. Pressing Esc mid-drag cancels it with no trace in Undo.
The transition's span on the head of the incoming block is marked with a thin cross (two diagonals) as wide as the transition's length; a caption at its bottom-left replaces the usual FX/BLEND captions (a transition has neither): "XF 1.0 s" means the transition runs its full requested length; "XF 0.4 s · no tail" means it was shortened for lack of material; "XF · no joint" means Crossfade is set on the block but there is no longer a joint with its neighbor (the gap grew past one frame, for example after a ripple-trim or a roll) — the transition is not drawn and behaves like a Cut until the blocks are brought back together.
Blocks never move on the ruler because of this. While the transition runs, the outgoing block keeps playing material PAST its end point on the ruler — the very "tail" that limits the available length — drawn at its normal opacity, with its own fade-out not applied inside the transition window. The incoming block fades in over it with a weight that rises linearly from 0 to 1 over the transition's length. Sound mixes by the same rule: both blocks are heard at once, the outgoing one's volume falling and the incoming one's rising by that same weight. Playback does not break at the joint: the outgoing block's player is not closed at the boundary, it keeps playing until the transition window ends; the incoming block is preloaded ahead of time (for the transition's length before the joint) so the first frame of the overlap is not a jolt. Exporting the track to a file and "Save frame under playhead…" use the same blending rule — the picture and sound in the saved material match what the canvas showed and played. This also holds when the exported range starts inside the transition window and leaves out the outgoing block itself: the outgoing block's fading sound still goes into the file, including when the incoming block is a generator (GRADIENT, NOISE, PATTERN) with no file of its own (since 0.8.89; before that, such a range was written without this sound).
A block can have either Crossfade or its own fade-out at the same joint, never both at once — choosing Crossfade in the menu clears the outgoing side's fade-out there, and the other way around.
When zoomed far out, so that either block of the joint is narrower than 24 pixels on screen, the joint has no handle — set the transition from the Transition menu instead. A length of one frame or less is a Cut: both dragging the handle and the CROSSFADE field in the effects window clear the transition in that case. While paused, scrubbing the playhead and stepping a frame inside the transition keep the outgoing block on the playhead just as exactly as the incoming one.
Split on a block with a transition keeps Crossfade on the left half (its joint with the previous neighbor); the right half gets a Cut — there is no transition at the cut point. Detach Audio carries Crossfade and its length over to the audio copy; detach the outgoing and incoming blocks together and their copies land back to back on the lane below, so the sound crosses over just as before Detach. Detach only the incoming one and its copy has no neighbor ("XF · no joint"), so its sound comes in at full volume straight away.
Lanes¶
Each track has its own lane header to the left of the canvas: one row per lane, showing the lane's name (default "L1", "L2", … by number) and two buttons, M (mute) and S (solo, listen to this lane only). Header rows sit exactly against the canvas rows — the same row-height scale as the timeline itself (the "TRACK H ±" buttons).
There is one audibility rule: mute beats solo on its own lane, and several lanes can be soloed at once. If a lane's M is on, it is inaudible no matter what S says. If no lane is soloed, every unmuted lane is audible; once at least one lane is soloed, only soloed (and unmuted) lanes are audible. An inaudible lane behaves like an empty one: the engine does not draw its picture or carry its sound, and on the canvas its blocks are drawn at half the usual opacity so this is visible without looking at the header. Exporting a track to a file (see above) stays honest to the screen too — blocks on an inaudible lane never make it into the saved file, and the export report lists them with a "lane muted" line.
| Action | How |
|---|---|
| Rename a lane | Double-click its name in the header, Ctrl+R (the selected block's lane, otherwise lane 1), or "Rename…" in the right-click menu |
| Add a lane | Ctrl+L (the same door as the "LANES +" button) |
| Remove the top (empty) lane | The "LANES −" button — its name, mute and solo go with it |
| Mute / solo one lane | That lane's M / S button, or the "Mute"/"Solo" checkboxes in the right-click menu |
| Clear mute and solo on every lane of the track | "Clear mute/solo on all lanes" in the right-click menu |
A block's Detach Audio (see "Clip blocks") can add a lane by itself. If the block whose audio is being detached sits on the track's last lane, the same command adds a lane below it — the same door as the "LANES +" button; the copy never goes below lane 16 (the shared cap of the engine, the panel and export); a single Undo removes the added lane along with the rest of the edit (the source block's flag and the "audio only" copy).
An empty name, or one that matches the default label "LCtrl+L adds no lane), at a single lane "LANES −" is disabled.
There is no "hold M (or S) and click another lane" gesture — toggle the buttons one at a time. Mute does not relieve the decoder: a muted lane's file, if it is playing, keeps decoding exactly as before.
Saving blocks to files¶
Right-click a block (or one of several selected blocks) → Save Clip as File… (with several selected — "Save N Clips as Files…") saves the piece of the source that the block shows as a separate file. The block's own transform, fades and opacity are not applied to the saved material — the raw piece of the source is saved.
Three modes: - As source (fast, stream copy) — no re-encoding, the same codec and container as the source. An exact, frame-for-frame cut is not possible without re-encoding — the cut starts at the nearest keyframe BEFORE the block's start; the report honestly states the actual start ("started 0.40 s earlier"). On files with B-frames the copy's end may come out 1–2 frames longer than requested — otherwise frames that reference the trimmed ones would be lost. - Hap Q — re-encoded, exact frame-accurate cut, no audio; for quick deck playback. - Exact — re-encoded (ProRes or MPEG-4, whichever formats the build carries), exact frame-accurate cut, with audio if the source has any.
Select several blocks — one dialog saves them all in turn, with a shared progress bar and a line-by-line report. A block with no source file (a generator) is skipped when saving, not treated as an error. File names are the source file's name plus the block's place on the timeline; a name already taken gets " (2)", " (3)" and so on — a batch never overwrites files it saved itself in the same run. The default folder is the first block's source file's folder (or the last save folder, if you saved before); it can be changed with Browse… and is remembered for next time. Subtitles and other data tracks of the source are not copied.
A block's audio as a separate file¶
Right-click a block (or one of several selected blocks) → Save Clip Audio… (with several selected — "Save N Clips Audio…") saves only the block's audio as a separate file — the same dialog as "Save Clip as File…", switched to audio mode (folder, progress and the report are shared). For a single block with no audio this item is disabled; with several selected blocks it is always enabled, and blocks with no audio are simply skipped in the report with the line "skipped: no audio".
Two modes:
- WAV (PCM 16-bit, 48 kHz) — the audio is re-encoded to uncompressed stereo PCM; the start is always
exact.
- Audio track copy (as source) — a stream copy of the audio track, no re-encoding, faster; the file's
extension depends on the source's audio codec (AAC → .m4a, MP3 → .mp3, PCM → .wav, FLAC → .flac,
anything else → .mka); as with the video copy, a frame-for-frame cut without re-encoding is not possible
— the report honestly states the actual start when it differs from the requested one.
The block's own transform, fades, opacity and lane mute are not applied to the saved audio — the raw source audio is saved. File names follow the same scheme as the video copy (source name plus the block's start/end timecode), with the same " (2)", " (3)" rule on a name clash.
The frame under the playhead¶
Right-click a track row (next to "Export Track to File…") → "Save frame under playhead…" saves the track's current frame as a separate PNG, sized to the composition. The default folder is the same one "Save Clips" uses (changed with the ordinary save-file dialog); the default name is the track's name plus the playhead's timecode.
The frame goes through the same lane pass as exporting the track to a file — block transform, fades, opacity and placement are taken into account the same way as on export. Live-output effects (a layer's FX chain, COLOR, transitions, a slice's mask/keystone, output mapping, DMX) are not part of the frame. An empty area of the frame (where nothing is drawn) is black, not transparent. Saving is synchronous (a wait cursor shows on screen) — the track's position and playback are not changed.
Exporting and importing a track as a package¶
Right-click a track row → "Export Track as Package…" (right under "Export Track to File…") saves the
whole track — its settings, lanes, tags, cue, notes and every block with its keys, transitions and
crossfades — into a new folder <Track name>.dltrack/: inside it, track.json and a media/ subfolder with
copies of every file the track's blocks reference. The dialog only asks for the folder to put the package in,
then copies files in the background with a progress bar and a Cancel button — cancelling removes the whole
created folder without a trace. If a folder with that name already exists, the package gets the name
"
"Import Track from Package…" (right-click empty space in the track list, or the track row's menu) →
pick the package's track.json → a NEW track is added to the rack with the same name (taken → "(2)", "(3)"
…), with all its lanes, tags, cue, notes and blocks — keys, transitions and crossfades carry over as they
are. Each block's file is registered in the project's palette from its copy inside the package, and the
package's folder itself is added to the project's media search roots — the same "Project Resources…" list
(page 16) that "Find Folder…" uses — so a package file that
moves later is found by the same search as any other project resource. A single "Import track" Undo command
removes the imported track entirely, with all its blocks.
Honestly, what carries over and what does not:
- the starting timecode and the time-of-day schedule carry over;
- the deck layer (which layer the track outputs to) and group membership do NOT carry over — the new track
is attached to neither a layer nor a group, assign them again by hand;
- Track GO cue actions that targeted a track or group of the previous project have their target cleared
on import — the action stays "Track GO", just with no target; the count of cleared actions is shown in the
summary right after import;
- Assign Slot cue actions carry over with the same palette index as is — in another project that index
may point to a different layer or source, exactly as with an ordinary project load that has such a cue;
- the source track's scene-cell assignments do not carry over;
- blocks without a file (a palette number only) carry over with the same index, just like Assign Slot — in
another project that number may point to a different source;
- Set Param cues and automation curves find their target by parameter name; curves whose target is not in
the project are skipped — the summary names their count;
- import opens only the copies in the package's media/ and absolute paths on local drives; relative paths,
network paths (\\host\…) and device names (CON, NUL…) go to "not found" and are not opened; a copy
missing from the package is "not found" too, and the block keeps its path inside the package;
- a file that exists but got no slot (the project's file table is full — 32 files — or it failed to open) is
a separate summary list with the reason, not "not found"; a block the lane refused is a count in the
summary;
- package copies take file slots of the project, Undo of the import does not free them, and the package
folder cannot be deleted or moved after import until the program restarts — the files are open;
- files are opened synchronously during import — from a network drive or a USB stick that is a pause of the
output, so import between cues.
On export, a source that is gone from its recorded path but is found by the project's root search is copied
into the package from where it was found. Copy names are compared case-insensitively, Cyrillic included
("Шоу.mp4" and "шоу.mp4" → "Шоу.mp4" and "шоу_2.mp4"); a track named after a Windows device (CON…) gets
the folder _CON.dltrack; pressing Cancel after the write has already finished still removes the folder.
The package is a folder, not a zip archive — open, copy or archive it with any file manager; a package carries only one track — a whole group still has no export of its own.
Timeline and a live deck on the same layer¶
Starting a deck window (a click on the grid or AT END autopilot) on a layer where a timeline block is
already playing mutes that block — picture and sound — until the next block on that layer or until the
timeline's STOP → PLAY cycle; a single PAUSE does not bring the block back. Conversely: a block that
starts on a layer where a deck window is playing manually stops that window the same way the layer's STOP
button would, once, at the moment the block starts; a window started on top of an already-playing block
still takes priority. While a timeline block is displaced by a deck window, a TL tag is shown on the
layer strip, and the block itself on the ruler is dimmed, labelled " · TL". By default a timeline block's
picture is fit to frame with no scale or rotation; a block gets its own transform and look from the clip
panel or from a transferred window (see "Clip blocks" above) — it still has no mask or keystone from a
window on the same layer.
A timeline lane and a deck window with the same file (on any layer) no longer share a single player — each has its own decoder and its own position. The block's file sync does not touch (does not seek) the deck window's player, even when it is the very same file, and the other way around.
Parameters¶
| Parameter | Values |
|---|---|
| Lanes per track | by the number occupied, LANES stepper |
| Track schedule | START / STOP — time of day |
| Cue action | none / Assign Slot (layer + source) / Set Param (parameter + value) |
| Timecode rate (display) | 24 / 25 / 29.97 Drop / 30 |
| LOOP range | IN–OUT on the ruler, or FULL — the whole timeline |
| Block transform and look | X, Y, SCALE X/Y, ROT, FLIP H/V, OPACITY, BLEND, name — from the clip panel; fit to frame, Normal, 100% by default |
Limitations¶
- A timeline block has no mask or keystone from a window on the same layer. A window's transport (MODE, IN/OUT), AT END, TRANSITION, COLOR and EFFECTS are not carried into a block — a lane has no transport of its own beyond its own SPEED and DIRECTION (see "Clip blocks" above, 0.8.79) or effects chain; a block's fades are set from its context menu. The fact that a block was displaced by a deck window is not recorded in the project.
- A track's STOP → PLAY cycle takes the layer away from a deck window started manually while it was stopped; PAUSE → PLAY does not do this.
- The parameter list for the Set Param cue action is a fixed set (master opacity, master crossfade, each layer's opacity); an arbitrary parameter cannot be chosen.
- A transition (see "Transitions") only works between two blocks on the SAME lane standing exactly joint; across a gap wider than one frame, or between different lanes or tracks, there is none. Jumping the playhead between sections or by cue stays instant — there is no crossfade on those jumps in this release.
- A track package ("Export Track as Package…") is a folder, not a zip archive, and carries only one track, not a whole group. Importing it does not carry over the source track's deck layer, group membership or scene-cell assignments; Track GO cue targets are cleared (the summary after import names the count); the palette index of an Assign Slot cue and of blocks without a file carries over as is and may point to a different slot in another project. Package copies take file slots (32 per project) and stay open until restart; files are opened synchronously during import — import between cues.
- SPEED keyframes on a block (0.8.86): between position checks (10 Hz) the drift from the curve can reach up to half a frame; earlier keys past the end of a block clamped to the file are invisible (as with the other keyed properties) and hold the edge value (a new key lands within the new length); a split inside a Smooth segment of the SPEED curve is continuous at the cut, but the halves only approximate the original curve (a 1 → 3 segment over 4 s split in the middle drifts up to 0.25 s from the original block); the left edge of a block that spans the whole file cannot be extended to the left with an accelerating curve, nor trimmed from the left with a slowing one (the window would run past the file); "Save Clip as File" does not bake speed and clears the SPEED curve from the saved material, the same as a static speed.