07a. Clip panel: TRANSPORT, TRANSFORM, LOOK
To the right of the scene grid is the clip panel: the settings of one selected grid window (modeled after programs in the Resolume family), built like a layer but stored separately for each window and saved with the project. Six settings groups — TRANSPORT, TRANSFORM, LOOK, END & TRANSITION, COLOR, EFFECTS — expand and collapse with a click on their header; every time the program starts, all groups are collapsed again — the expanded state is not saved to the project or between sessions. Each group has its own RESET button in its header.
Above the group list is the window's info line (CLIP · L<n> / SCENE <m>, a LIVE · L<n> badge if the
window is currently playing, the file name and its resolution/frame rate/duration) and a window rename
field with eight color swatches: an empty field shows the file name, typed text replaces the label in the
grid cell, the chosen color tints its tag.
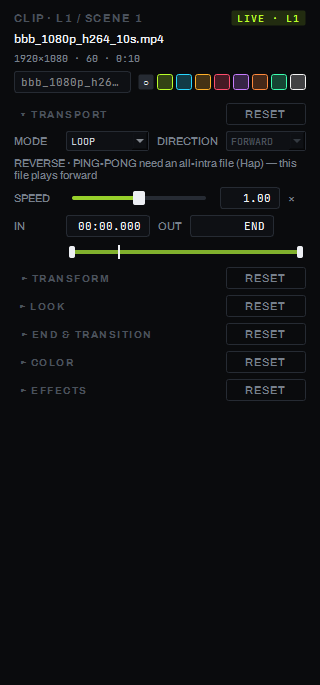
Fields for sources without a transport (generators, live sources) are shown greyed out — the TRANSPORT group does not apply to them. Replacing the file in a window resets only IN/OUT, leaving the other groups untouched. If the same file is open in several windows of one layer, panel edits (TRANSPORT or any other group) on a window that did not start it do not reach the layer until that window is started — they are only visible on the window that is currently playing.
TRANSPORT
Files only:
- MODE — LOOP, PING-PONG (back and forth), ONCE (one pass, then stop on the last frame), ONCE+CLEAR (one pass, then the layer goes dark);
- DIRECTION — FORWARD / REVERSE;
- SPEED — a logarithmic slider, 0.1–4×;
- IN / OUT — by a time field or by dragging the markers on the bar, where the current clip position scrubber also sits.
TRANSFORM
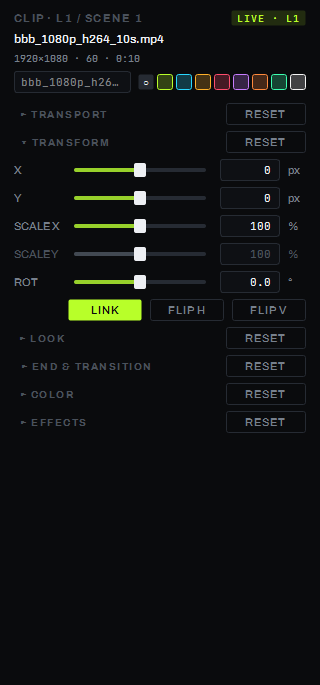
- X, Y — image offset in pixels from the frame center;
- SCALE X, SCALE Y — horizontal and vertical scale separately, as a percentage of "fit to frame";
- LINK — a button before FLIP H: on by default — SCALE Y follows SCALE X (the same behavior as before the second scale existed), the SCALE Y row is shown but disabled. Turn LINK off and SCALE Y becomes its own value, editable separately from SCALE X; turn it back on and SCALE Y instantly picks up SCALE X again;
- ROTATION — rotation in degrees;
- FLIP H / FLIP V — mirror horizontally / vertically;
- FILL / STRETCH (since 0.8.65) — action buttons in a second row under LINK / FLIP H / FLIP V; they do not stay pressed. FILL fills the frame with no bars: the aspect is kept, the excess goes past the edge, LINK turns on (16:9 video in a 4:3 composition — SCALE 133%). STRETCH stretches exactly to the frame: the aspect is distorted, LINK turns off, one axis stays at 100%, the other gets its own value. Both reset X, Y and ROTATION to zero and leave FLIP H / FLIP V as they were; RESET of the group returns to "fit". They also work for a timeline block (the size comes from the block's file, Ctrl+Z in the timeline undoes). For a live input that is not connected yet (size unknown) the buttons change nothing.
Default — the frame is fit to the window pixel for pixel, with no offset, scale or rotation, LINK on. A project saved before SCALE Y existed opens with LINK on — the scale stays shared, as before.
LOOK
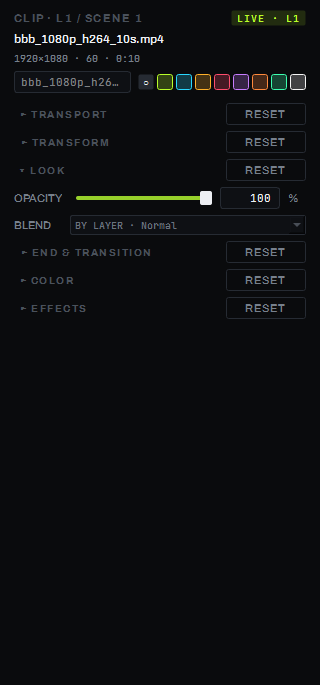
- window name and color tag — the same fields as in the panel's info line (renaming and the eight colors);
- OPACITY — an opacity multiplier on top of the layer fader;
- BLEND — this window's own blend mode, or "BY LAYER" (the mode is taken from the layer strip).
Parameters
| Parameter | Values |
|---|---|
| MODE | LOOP / PING-PONG / ONCE / ONCE+CLEAR |
| DIRECTION | FORWARD / REVERSE |
| SPEED | 0.1–4×, log slider |
| X / Y | pixels from the frame center, default 0 |
| SCALE X / SCALE Y | % of "fit" per axis, default 100 |
| LINK | on by default — SCALE Y follows SCALE X |
| ROTATION | degrees, default 0 |
| OPACITY | 0–100 %, default 100 |
| Window BLEND | its own mode (of 23), or BY LAYER |
Limitations
- REVERSE and PING-PONG only work for all-intra files (Hap and similar, with a key frame on every frame); regular H.264/HEVC with a long GOP always plays forward — the panel notes this right under DIRECTION.