06. Composition
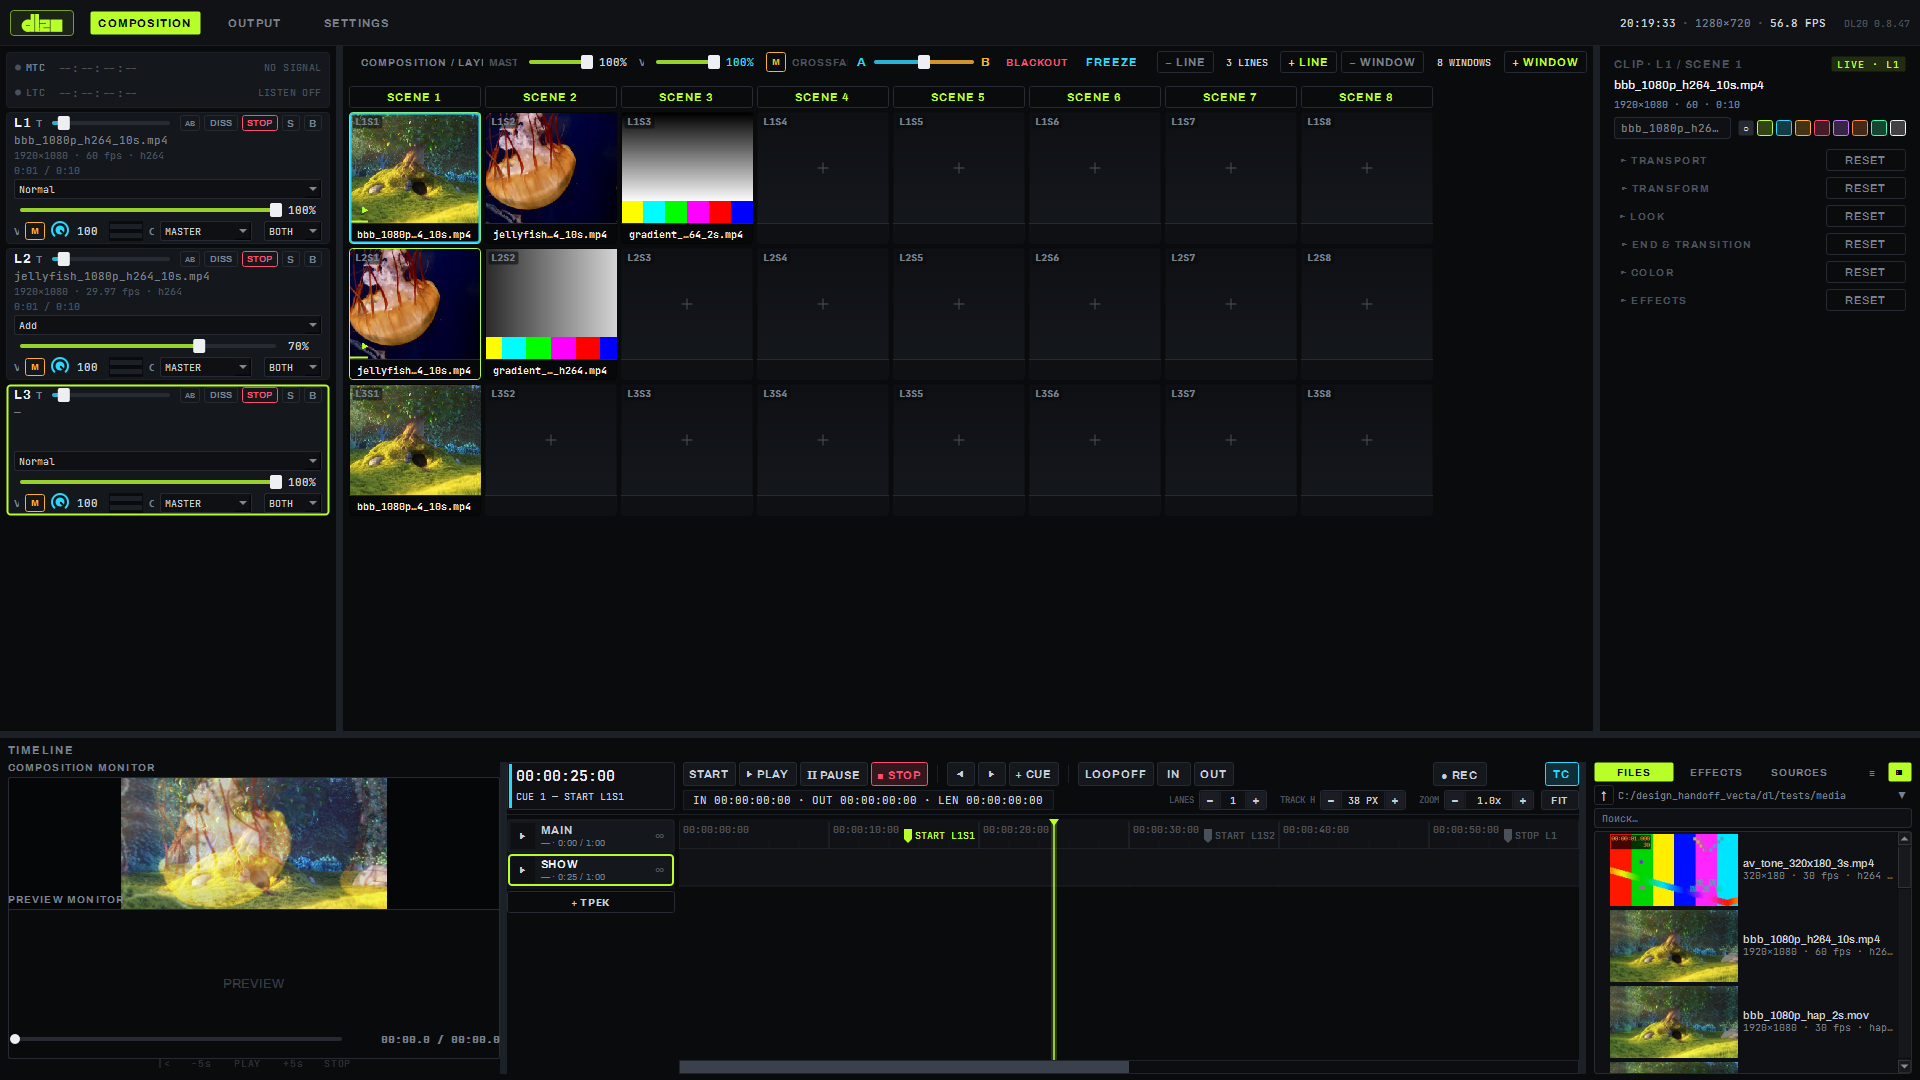
The COMPOSITION screen is the operator's workspace during a show: a grid of windows with content, layer strips on the left, the settings panel of the selected window on the right, and the timeline and media browser at the bottom. This is where sources are placed into the grid, started and stopped, several layers are mixed together, and the whole show is controlled through the master section.
Layers and windows
A layer (on screen — a row labelled L<n> on the left) is a compositing slot: whatever plays on a
layer reaches the final picture through its own settings strip. A window is a grid cell, a place for
one source; the full address of a cell is scene-row, e.g. L1S1 (layer 1, scene 1): this label sits
in the top-left corner of every cell, empty or occupied alike — so the operator always sees where a clip
will land.
There are several layers by default; they can be added and removed with the − LINE / + LINE
buttons at the top edge of the grid (from 2 to 8); the same applies to columns (windows per scene) —
− WINDOW / + WINDOW, 8 by default, up to 32. Next to the buttons are the N LINES and
N WINDOWS counters.
An occupied cell carries a preview of its content, the file name below the preview and a colored layer
tag; an empty cell shows only its L<n>S<m> label and a + sign. If a cell's file was not found when the
project loaded (an external or network drive was disconnected), the cell is not cleared and does not show as
empty: it looks like an empty slot labeled NO FILE and keeps its place in the grid until the file is
found or the operator replaces it — see the "Project Resources…" window on page
16. Project, Autosave, and Diagnostics.

The same file opened in windows on two different layers plays as two independent players: starting, stopping, speed, IN/OUT points, reverse and the end-of-clip action of one layer do not affect the other, and each layer's sound comes from its own player. The cost — two layers with the same heavy file decode it twice (two decoders, double frame video memory); assigning the file to a layer where it was not already playing opens it again, with a short warm-up, the same way it does on a first launch.
Layer strip
To the left of the grid, each layer has its own settings strip, top to bottom:
- top row: the
L<n>label, the T slider — layer transition time (0–10 s in 0.1 s steps, default 1 s, 0 s = an instant cut with no transition), the crossfader bus button (switches A / B / AB — which side of the crossfader the layer is assigned to), the transition button (the current transition's name, DISSOLVE by default; a click opens a list of 16: DISSOLVE, WIPE in four directions, PUSH in four directions, TO BLACK, TO WHITE, TO COLOR with its own color, ZOOM IN, ZOOM OUT, ELLIPSE, STINGER), STOP (mutes only this layer), S — SOLO, B — BYPASS; - what is currently playing: the file name (or
—if the layer is empty), below it — resolution, frame rate and codec, and a line with the current position and duration; - the blend mode dropdown (23 modes — Normal, Darken, Multiply, Color Burn, Linear Burn, Lighten, Screen, Color Dodge, Linear Dodge, Overlay, Soft Light, Hard Light, Vivid Light, Pin Light, Hard Mix, Difference, Exclusion, Subtract, Divide, Hue, Saturation, Color, Luminosity);
- the layer opacity fader (0–100 %) with a numeric field;
- the clip audio row: the M button — MIDI Learn for this layer's volume, a volume knob with a numeric field.
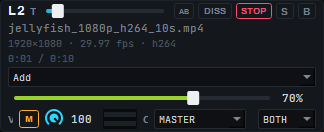
The strip's audio controls — the OUT output, CH channels and the level meter to the right of the knob — are described on the 15. Audio page.
Scenes
A grid column is a scene: the SCENE N button above it starts all occupied cells of that column at once, one per layer (from the keyboard — Ctrl+1…8). An empty cell of a scene on some layer mutes that layer — the same way the STOP button on its strip does. Keys 1…8 without Ctrl start window N on the selected layer.
Starting and stopping a window
A single click on an occupied cell starts its content — with the layer's transition or its own window transition (the END & TRANSITION group of the clip panel), clicking the same cell again stops it. Clicking an empty grid cell mutes the layer it sits on, the same way STOP on the strip does. Switching between two occupied windows of the same layer plays a transition the same way a regular start does — the layer's old content is not cut abruptly, unless the transition is set to 0 s.
A transition now also plays on an empty layer: starting a clip into an empty cell shows it with the same transition as switching windows — it appears out of black. Muting (STOP on the strip, clicking an empty cell or an already playing window, ONCE+CLEAR at the end of a clip) fades the layer out with the same transition — the old content is not cut abruptly until the transition finishes. A transition time (T) of 0 still means an instant change with no transition, in every case.
A right click on a cell opens it — selection (the same cell becomes "current" for the clip panel), a MIDI Learn binding for starting it, and clearing the cell's content.
Master section
In the top bar of the screen, above the grid:
- MASTER — the overall fader for the whole composition's picture;
- VOL — overall audio volume (master level, separate from individual layer volumes);
- M next to VOL — MIDI Learn for master volume;
- CROSSFADE — the A/B crossfader: mixes the layers assigned to side A with side B (evenly by sound power, bound to MIDI CC 8 by default);
- BLACKOUT — emergency blackout of all visual outputs (Ctrl+Shift+B);
- FREEZE — holds the last shown frame on all outputs (Ctrl+Shift+F).
Next to this panel is a live, downscaled preview of the whole composition (the COMPOSITION MONITOR at the bottom of the screen); under render load its resolution drops automatically, without affecting the picture on the outputs.

Parameters
| Parameter | Values |
|---|---|
| Layers on screen | 2 to 8 (− LINE / + LINE buttons) |
| Windows per scene (columns) | 8 by default, up to 32 (− WINDOW / + WINDOW buttons) |
| Layer transition time (T) | 0–10 s, 0.1 s steps, default 1 s; 0 s = instant CUT |
| Layer and window transitions | 16: DISSOLVE, WIPE ←→↑↓, PUSH ←→↑↓, TO BLACK, TO WHITE, TO COLOR, ZOOM IN, ZOOM OUT, ELLIPSE, STINGER |
| Crossfader bus | A / B / AB |
| Blend modes | 23 |
| Composition resolution | from 640×360 to 16384 px per side (area no greater than 16384×8192), or custom; changes on the fly |
| Composition frame rate | 24 / 25 / 30 / 50 / 60 |
| Texture bit depth | 8-bit RGBA or 16-bit float |
Limitations
- MIDI Learn is set up only through the M buttons and a right click on screen elements — there is no separate screen listing all bindings or a BPM/TAP/QUANT cluster in the top panel.
- STINGER is a built-in luma-based wipe; attaching your own clip as a stinger is not yet possible.
- The transition time slider (T) cannot be bound to MIDI or LFO modulation; some transition effects found in other programs (like Twitch, Static, Tile) are not in the list; the ZOOM and ELLIPSE shapes are fixed.